
Indico Collaboration
Indico is an open source web application that can be downloaded here. The main development is done at CERN but many other organizations world-wide are contributing with new developments, improvements and bug fixes.
We welcome anyone to participate in the project and to help make it better.
A word about the development process
Indico uses Git as its version control system. Git is a distributed VCS, meaning that that each user has his/her own copy of the "central repository". As a matter of fact, the "central repository" (if it exists) is no more than the one everybody agrees on.
Indico's development process relies on a "master repository" (located at CERN and replicated across the web) and "gatekeepers" or "integrators". Integrators are the only people with write access to the master repository - they decide what gets accepted, rejected and suggest changes.
The procedure
- Sort out which kind of public repo you are going to use (GitHub?, your own git repo, patches?) and configure it properly
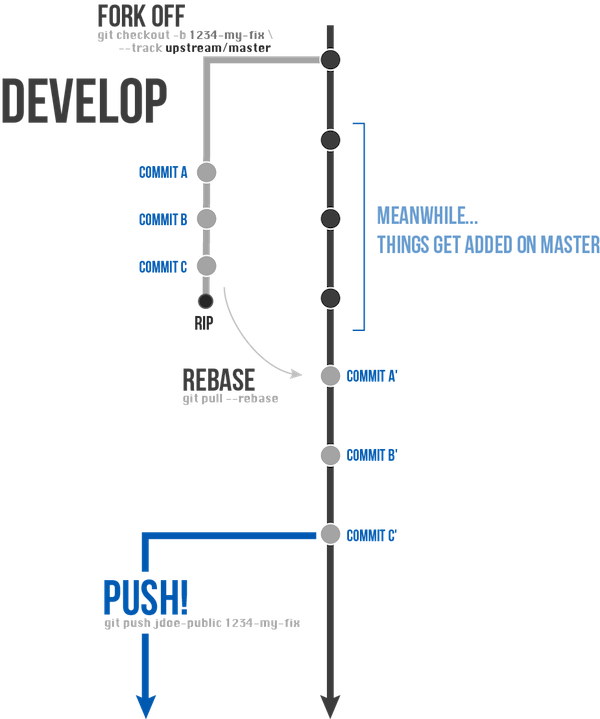
- Fetch the latest version of the master branch: git checkout master and git pull
- Branch out from upstream master: git checkout -b 1234-my-own-branch --track upstream/master
- Develop whatever you have to do and git commit -a (can be done several times);
- Rebase with the remote master (git pull --rebase)
- Push your changes to your public repo: git push my-public-repo 1234-my-own-branch
Creating a public repo
First of all, take some time to read our "Getting Started" guide and follow the instructions. After following this guide, you should have your development environment set up. Please note that the repository that you use as origin will depend on how you want to contribute. There are three options:
- Submitting patches;
- Using plain Git and a public repository;
- Using GitHub?;
Using patches
This is the least user-friendly option. Unless you can't really use any of the other options, this is highly discouraged.
If you wish to contribute a patch to Indico, you can do so by using the git format-patch command. For instance:
$ git format-patch master
0001-IMP-Add-disconnect-button-vidyo.patch
Creates a series of patch files that you can then attach to a Trac ticket. For obvious reasons, it would be good that you minimize the number of commits (squash them?).
Using plain Git and a public repository
This second option is better than the first, but has the downside that the public repo should be accessible somewhere. Fortunately, nowadays services like GitHub and BitBucket provide public GIt repos for free. If you are sticking with GitHub?, then jump on to the next section - things will be much easier, no need to complicate. Otherwise, read on.
So, you have finished your work and you have a new branch that you wish to publish for reviewing and merging into the master repo. The first thing you should do is telling Git you have a public repo where to publish things:
$ git remote add origin ssh://jdoe@myserver.com/home/jdoe/repos/indico.git
And that indico's upstream repo is somewhere else:
git remote add upstream git://github.com/indico/indico.git
You are ready to push things to your public repo:
$ git push public 1234-fix-my-new-branch
Don't forget to rebase on upstream/master before pushing! Now, you can open an issue at this same Trac site (New Ticket), specifying the repository/branch you want us to fetch your changes from.
Using GitHub?
Using GitHub? makes things slightly simpler. GitHub? allows you to have your own Indico repo, based on the master one, just by clicking a button. You can then do all the changes you want on your public repo and then create a "pull request" so that we know you are asking for your changes to be integrated.
Here's how to create your own Indico "fork":
- Create a GitHub? account
- Go to our repo page
- Click "fork"
And in a few seconds your repo should be ready. Then, just follow the instructions GitHub? provides you on how to clone your new repository locally. Your public repo will now be the origin in your local repo. You may want to add a remote reference to the master repo:
$ git remote add upstream git://github.com/indico/indico.git
In order to push your changes into your public repo, just do:
$ git push origin 1234-fix-for-something
In a picture

Some Basic rules
- Your code must be compliant with the GNU/GPL license
- Think in general terms: your contributions should be usable by any other institution. So avoid specific solutions and think in a more abstract way.
- There are a few rules for software development that you must follow. Please, read from here.
Some tips
- Tips for developers using Git:
- Things you should do:
- before creating a branch, pull all the modifications from the origin (here at CERN: http://indico-software.org/repo/).
- create topic branches for your contributions and please name them sensibly (see naming conventions below).
- rebase before pushing the branch in your public repo, but never again rebase that branch.
- push to your public repo, only after you have finished and tested the feature you have developed.
- Things you should never do:
- do not work on the master branch; create always a new branch for your developments
- do not rebase or squash on your remote public repo
- do not rebase a branch in your private repo when that branch has already been pushed into your public repo
- Naming conventions (branches):
- Use dashes instead of underscores: i.e. #1234-foo-feature
- The branch name must start with the trac ticket number: #ticket-*
- Things you should do:
Attachments (1)
- diagram.png (81.0 KB) - added by pferreir 3 years ago.
Download all attachments as: .zip